
How to Install Metal Roofing


Metal roofing is a popular choice these days, and there are plenty of reasons for it. For starters, it lasts anywhere between 40 and 70 years, which will change based on the material. It is also a durable choice that helps homeowners save energy. Moreover, metal roofing comes in many colors, textures, and styles that make it perfect for almost any home or style preference. Therefore, learning how to install metal roofing will allow you to improve your home’s efficiency and aesthetics while saving money.
Get the Roof Ready
License: Creative Commons
The first step to installing metal roofing is getting the roof ready. It involves measurements and calculations you will use when ordering materials. It also includes getting the materials and setting up the work site, allowing you to remove the old roofing, repair any damage before the installation, and add insulation without worry.
Take Measurements of One Section
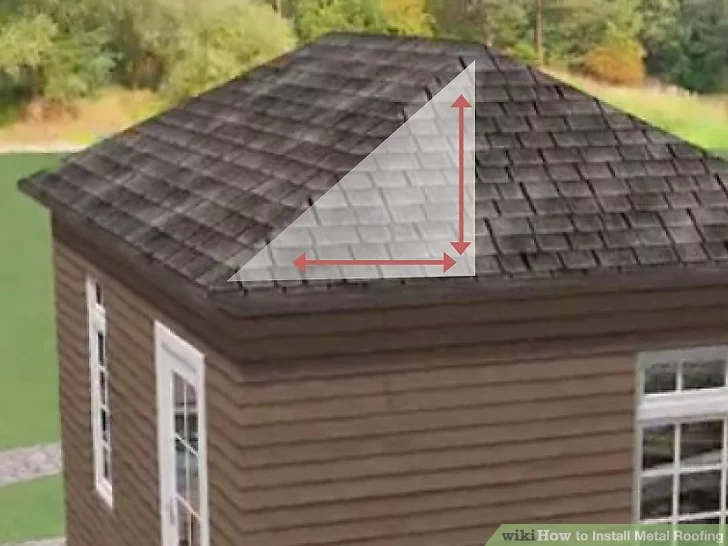
It is easiest to proceed by measuring one section at a time. As such, make sure to pick a section and get the length and width. You will also want to measure the rise of the section. Keep in mind that accurate measurements are vital for ordering materials, so doing this part correctly will save you time and money.
First, measure the length and width. After that, get the distance the roof rises. You will want to go from the lowest point to the highest point. Preferably, you can do the measurements from the ground. But if that is not an option, make sure to take proper precautions, even if you have experience with similar work.
Once you are sure you have the measurements, it is time to move on and calculate the slope factor.
Calculate the Slope Factor
License: Creative Commons
Calculating slope is as easy as rise over run, with the rise being the distance up the roof and the run being the distance across the roof. Typically, it will be a measurement across 12 inches (30.5 cm). For instance, 4/12 or 8/12. Once you have rise and run, the next step is to convert it to the slope factor using the formula √(rise2 + run2) / run.
Here are step-by-step instructions that will make it easy to follow the formula and get the correct calculations:
- Square the rise
- Square the run
- Add the squared values
- Get the square root of the sum
- Divide the new value by the run
Once you have the slope factor, it can be used to determine the area of the section from which you took the measurements.
Determining the Area with Slope Factor
Area equals the length times the width, but in this instance, we also want to multiply by the slope factor. The end result is a formula where area equals length x width x slope factor. By plugging in the correct values, you can get the square feet that need to be covered for that section.
Imagine you have a roof with measurements of 10 feet (3.0 m) by 15 feet (4.5 m) with a slope of 12/12. The slope factor would be calculated with √(12 x 12 + 12 x 12) / 12, and it would come out as 1.414. You then find the area of roofing needed for that section by multiplying the values together, so 10 x 15 x 1.414, which gives you 212 square feet.
Once you feel comfortable with the measurements and math, you can determine the total square footage and start getting your materials.
Find Square Footage and Buy Materials
License: Creative Commons
The square footage is easy to find once you have the previous steps mastered. To find square footage, do the above steps for every section of your roof. Once you have all the measurements, simply add them together. That will give you the exact amount of metal roofing you need to order, though you should probably purchase somewhere around 10% extra to account for waste.
With the square footage in hand, getting materials becomes the main focus. The metal roofing will probably need to be ordered so you can get the material and color you want to suit your house. Additional tools and materials you will need include:
- Large garbage can or dumpster
- Jigsaw or power metal shear
- Staple gun
- Drill and assorted bits
- Roofing nails (1¼ inch)
- Metal roofing screws
- Self-drilling, self-sealing wood screws
There might be other tools and materials you need, but these cover the basics. Once you have your materials and tools in order, you will want to prep the work site.
Prepare the Work Site
License: Creative Commons
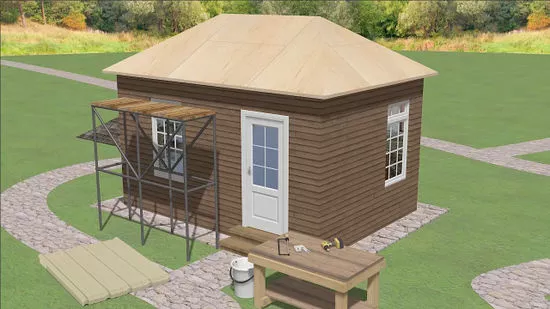
Every work site is different since there is a lot of home variety out there. People tend to prefer different setups as well. However, you want to make things as neat and organized as possible to save time and prevent injuries. Here are some tips to keep in mind when preparing your work site:
- Have a garbage can or dumpster around for the old roofing and debris
- Dedicate a place for tools to keep them safe and organized
- Set up sturdy scaffolding or a ladder
- Make sure electric tools can be used without any tangled or intrusive cords
- Store materials in an accessible area safe from weather
Proper planning is worth the effort, and it will make the rest of the steps much easier and safer. Next up is removing the old roofing.
Remove the Old Roofing
License: Creative Commons
Corrugated metal roofing can be installed over shingles, but it does not provide as good a foundation. Usually, you will want to remove the old roofing before you install metal roofing. Take your time and make sure you get the job done without damaging the bare bones of the roof. Here are some tips to make the job easier:
- Start at the highest point as far away from the trash container as you can
- If you see large nails sticking out, remove them or hammer them flush
- If needed, reposition your gutters at this stage
- Only remove old roofing on dry and sunny days to avoid moisture
With the old roofing removed, the last steps are repairing any damage and putting down insulation.
Repair and Insulate
License: Creative Commons
The old roofing might have been covering up damage to the sheathing, insulation, or ventilation. If you see anything wrong, take the time to fix it before going any further since it should all be exposed and easy to access.
Once any damage is repaired, you can move on to adding an insulation layer. It will help block moisture between the sheathing (the wood under the roofing) and the metal roofing. Start with roofing felt across the entire roof. You can secure it using a staple gun or nails. After that is done, cover it with a breathable membrane.
Install the Metal Roofing
At this point, the project should be thoroughly prepared, so it is time to begin installing the metal roofing. Before getting into it, make sure you have a pair of thick gloves. Metal roofing can be very sharp at the edges, so wear gloves when handling it. With that in mind, you can move on to installing the edging.
Install the Edging
License: Creative Commons
The first step when you go to install metal roofing is installing the edging, or eave flashing. Edging consists of metal strips that cover the perimeter of the roof, and it can be secured to the subroof using the 1¼-inch nails mentioned in the materials step above. Also, if you have them, make sure it overlaps with the edge of your gutters.
Add the Metal Panels
License: Creative Commons
With the edging installed, it is finally time to move on to the metal panels. When you start, always make sure to begin where the peak-to-eave distance is the longest. As you put the metal panels on the roof, you will want them to hang over the edge by at least ¾ of an inch. It should be perfectly perpendicular to the edge.
Securing the metal panels to the sheathing comes next, which you will do using neoprene washer head screws. You will want to place the screws around 12 inches apart from one another from the top to the bottom of the metal, and they should be evenly aligned.
When dealing with exposed fasteners, you need to avoid over-tightening them. You only want them to seal the site, which does not require it to be overly tight since each has a rubber grommet. However, if you tighten it too much, the rubber grommet might be displaced, which means you need to remove and replace it.
After getting one metal panel in place, you can continue to install the rest. Make sure they overlap by a minimum of one inch. The overlap might change, but you want to continue overlaying them until the entire roof is covered.
Some people also feel the need to use sealant. If you decide you need it, you can put a bead of sealant, such as 100% silicone or adhesive silicone, prior to placing the metal panel. When doing this, lay the bead toward the edge of the bottom sheet for best results.
Add the Flashing
License: Creative Commons
The metal panels are down, but there is still a bit left to do. An important part when you install metal roofing is adding flashing to protect the areas where the different sections meet. The flashing is a metal trim that is placed over the joints, and it should be used at any point where two sections meet with an angle of less than 140 degrees. It should also be used as end caps where the tops of two sides meet.
When dealing with flashing, it can be bent. In most cases, it is bent into a “V” shape to fit atop a section. It might also require using one or two rows of screws, depending on the width of the flashing.
Finish Up
After the flashing is secure, you are done. All you need to do after is make sure every part of the roof is covered and properly secured. The edges should also be smooth and finished. You now have a fantastic metal roof on your home.
David Bitan
Roofing Contractor & Maintenance Professional
David Bitan is a roofing professional, licensed contractor, and the owner and founder of Bumble Roofing based in Southern California. With over 12 years of construction industry experience, David specializes in restoring, repairing, and maintaining residential, commercial, and industrial roofs. With over 60 years of combined experience, Bumble Roofing provides easy, friendly services to structures including residential, commercial, industrial, multi-family, and government buildings along with hospitals, hotels, and churches.
Find Your Bumble Roofing Location
Find Your Location
