How to Apply Fibered Aluminum Roof Coating
Roofs are under the sun every day, which can eventually cause damage. That is especially true if your Thousand Oaks roof is vulnerable to overheating. Using an aluminum roof coating is one of the ways to prevent that, and it is particularly useful if you have a flat asphalt or rolled roof.
Aluminum roof coating works by reflecting the direct sunlight pouring down on the roof instead of absorbing it. By doing that, the coating protects your roof from damage and can even reduce the energy bill in the summer months by lowering the need for AC. The best part is that even though the performance is great, applying it is quick and easy.
The process begins with thoroughly cleaning the roof, where you will sweep away debris and use a pressure washer to get rid of heavy buildup. Then, once it dries, you can make any repairs before mixing and applying the aluminum coating. The process requires time for the coating to dry, so take that into account before starting.
One thing to note is that fibered aluminum roof coating products tend to be highly flammable, so you must keep them away from open flames. You should take that into account during use and storage.
Cleaning the Roof
It is always important to clean the roof before you do any type of work up there. Cleaning will prevent potential safety issues and ensure nothing gets trapped beneath the aluminum coating during application. You will first find a way onto your roof, then remove debris. If needed, you can even use a pressure washer for heavy buildup before letting things dry and moving on.
Get on the Roof
Multi-story commercial builds often have stairwells or ladders attached to the side of the building that allow you to access the roof. If those are an option, use them. Otherwise, you will need to use a portable ladder that is several feet taller than the roof or step out of a window onto the roof, depending on the build of your home.
Either way, get onto the roof carefully, finding your foot and remaining a few feet away from the edge at all times. Safety should always come first, so avoid vents, skylights, and anywhere that shows signs of rot or damage. You might even want to consider having someone steady the ladder as you climb and setting up a safety harness.
Remove Debris
The larger pieces of debris, such as leaves and twigs, can be gathered by hand, especially if they are collected in a gutter or somewhere else easy to reach. Try placing all of the debris in a garbage bag, which you can easily throw away later to avoid having to pick it up from somewhere else later.
Anything remaining on the roof, including dust and dirt, is easy to remove by sweeping. The best choice is a stiff brush, which will help you get rid of everything with several passes. Attempt to go from one side to the other and leave behind as little debris as possible so that it does not show up in the finish.
Alternatively, you can use a shop vac to suck up any dust and dirt. Doing that means you do not have to worry about cleaning the small debris up at ground level later.
Pressure Wash Heavy Buildup
If there is any buildup that cannot be removed with a quick brushing, you will want to consider a pressure washer. It is effective against mold, mud, and oil stains, though some particularly stubborn spots might require special cleaning solutions meant to be used on roofs.
Generally, a pressure setting between 30 and 50 psi will be sufficient to make things spotless, but the exact needs will vary. After sweeping the area and loosening things up, you can usually turn it down to around 20 psi to rinse things off.
Let It Dry
Not only will aluminum coating not properly adhere to a wet roof, but you should never climb on a wet and slippery roof. With that in mind, give the roof time to dry after washing it, waiting a minimum of two hours, even on a clear, warm day. However, you might have to wait anywhere up to 24 hours.
Repairing Any Damaged Areas
Before applying the aluminum coating, you want to ensure there is no damage. In particular, pay attention to cracks or holes, which should be patched before you do anything else. After you use a patching compound, you will sand it down and sweep the roof one more time before getting started with the coating.
Do a Thorough Inspection on your Roof
While serious damage will likely need more extensive repairs and even professional roofers, you can fix minor damage using roofing cement or epoxy. So, take a quick look around the roof, keeping an eye out for holes, cracks, weathered spots, and anything else that looks like a problem. These issues will need to be solved prior to the coating.
Patch Cracks and Holes
A crack or hole can be fixed with roofing cement or something similar, and it is usually a simple fix. You just need to apply as much compound as needed to fill each problematic spot and spread it until it is smooth. While most compounds can be spread with a trowel or putty knife, some epoxies require special tools.
Once you have the areas filled, give the compound enough time to harden. The only exception is if the area is larger than around three or four inches, in which case, you will want to press high-strength roofing mesh into the compound while it is fresh. The mesh increases the repair’s durability.
Allow Patching Compound to Dry
The best bet is to check the product for specifics on how long it takes to dry. However, most products will start setting in around 90 minutes and fully harden in around three days. The weather will also impact the time. Just make sure not to handle the cement or oxy while it is wet to avoid blemishes.
Sand the Patched Area
Once the patching compound is dry, you can start sanding it using high-grit sandpaper, which should be within the range of 100- and 120-grit. Use a smooth, circular motion until all lumps and ridges are worn down, creating a smooth surface. It should look the same as the surrounding roof. You can also consider a power sander for faster results.
Sweep the Roof Again
There will be debris from the sanding, which will need to be swept away to avoid problems with the finish. Take the stiff broom you used before and clean the roof once more. An alternative is to use a hose to wash the roof, but that would mean waiting for it to dry again before moving on to the aluminum coating.
Mixing the Aluminum Roof Coating
Mixing the aluminum roof coating is the final step before you can apply it. However, you still need to prepare a few things, including protective equipment. It is also important to wait for optimal weather conditions since rain will affect the process. Once you have the proper equipment and a plan, the mixing can begin.
Wait for Optimal Conditions
The weather does not have to be clear and sunny every day, but there should be no rainfall for 24 to 36 hours after the application of the coating. Therefore, look for a period of clear days to do the work. Preferably, pick days when it will be between 60 and 100 °F with low humanity for the fastest drying.
If you fail to pick good days, complications could arise. Excessive moisture can cause a splotchy finish, while intense heat will interfere with the drying process.
Prepare Protective Equipment
Dealing with aluminum coating requires protective equipment. Closed-toed shoes, thick work gloves, and protective eyewear and the basics that must be used, but you should also consider wearing clothes you do not mind getting stained. Additionally, if you have sensitive airways, consider a mask to filter the fumes.
Open and Mix the Aluminum Roof Coating
Before you get started, keep in mind that you will need around a gallon of aluminum coating for every 50 square feet of roofing. Once you have the coating, go ahead and open a bucket. Inside you should see a thin, black liquid at the top, which is due to natural separation.
Because of the separation, you will need to mix the coating before use, which is made easier by using an electric drill with a mixing paddle. Push it to the bottom of the bucket and begin mixing, running it at the lowest speed until it has a shiny, uniform metallic color. You can also mix manually, but it will take far more time and effort to reach the proper consistency.
Rolling on the Coating
When you go to roll the coating on the roof, make sure to start in a far corner, working back toward your access point. Doing so will ensure you do not trap yourself and make for the most efficient work. Other than that, you simply have to pour the coating over small sections and roll it into a thin layer, going bit by bit until it is over. After that, it is all about letting it dry and getting the tight areas that are difficult to coat with a roller.
Pour Coating Over a Small Section
When dealing with the aluminum coating, slowly pour around a quart of it over a five- or six-foot strip. Do not use too much since it spreads evenly. Instead, focus on pouring just enough and smoothing it out a little at a time, being careful not to get any on your clothes as you do.
Roll the Coating Into a Thin Layer
Once you have the strip of coating poured out, take a 3/4-inch nap roller and start spreading an even, thin layer. You can use a back-and-forth motion over the fresh coating, keeping your strokes in the same direction for consistency.
Make sure not to leave any gaps or lines in the finish, and cover an entire section of the roof before going to the next section. You might also consider using a long-handled roller to cover larger areas and avoid the strain of bending.
Continue Pouring and Rolling Coating
You want to use the same method to cover the entire roof in the aluminum coating, working from one corner of the roof to the other. It is important that you blend the edges of each section so that everything is seamless. Once you finish, make sure to remove all tools and leave the coating alone to let it dry.
Let the Coating Dry
The coating needs to become dry to the touch before you can take care of the smaller details. In part, that is because you need to be able to walk on it, which usually takes between five and eight hours. However, weather and other factors can influence the time it takes to dry, so do not rush things.
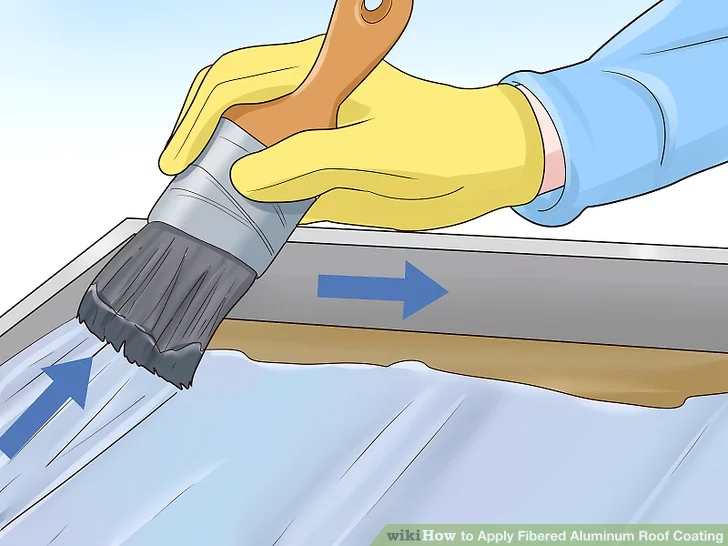
Take Care of Tight Areas and Edges by Hand
When the coating you applied before is dry, you can start taking care of tight areas and any edges. At this point, using a roller is difficult, so grab a handheld brush and dip it in the coating. After that, start applying a layer at corners, crevices, recesses, and anywhere else that needs it. Try to use long, linear strokes for the best finish.
Allow the Coating to Cure
It might take an entire day for the coating to cure and provide protection against moisture, pressure, and heat. However, once it successfully dries, it will seal and protect the roof, extending its lifespan. While that is happening, you can start cleaning your tool, which is made easier by soaking them in mineral spirits.
We Turn Every Project Into A Hive Of Excellence
-

Masterful Craftsmanship
Our skilled team merges art with function to ensure every roof is a testament to expert craftsmanship and quality.
-

Fast & Efficient
Time is of the essence, and we value yours. Count on our prompt and efficient service for all your roofing needs.
-

Guaranteed Satisfaction
Happiness is our benchmark. Experience peace of mind with our 100% Satisfaction Guarantee on every project.

Our mission at Bumble Roofing is to set new standards in quality by ensuring clients receive top-tier service, world-class materials, and an enduring roof over their heads.